Introduction
The Universal Style allows lecturers to use both the Tablet and Mimio pen together. Hence we no longer have to worry about the lecturer's preference on Tablet or Mimio.
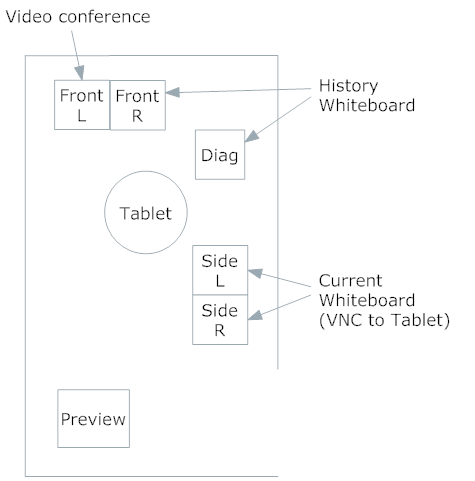
In this style, all teaching programs are launched in the Tablet. The "Current Whiteboard" (Side L + Side R), will only mirror the Tablet's screen via VNC. This means that whatever the lecturer sees on the Tablet will appear on the "Current Whiteboard". If a lecturer wishes to share his/her laptop's display, then the Tablet should launch a VNC client to that laptop so that anyone (local and remote participants) can view them.
We then have another set of screen called the "History Whiteboard" (Front R + Diag) which will replicate the "Current Whiteboard" when the lecturer moves to a new page. This will provide lecturers more spaces to write on. A program called the "CapNSend Viewer" is placed here so that the contents of "Current Whiteboard" can be replicated to it.
Therefore, when remote participants are to view our sites, they will need to connect to two separate screens. One is to the "History Whiteboard" (Gridroom PC) and the other is the "Current Whiteboard" (Gridwbrd PC).
Lastly, we have one screen for video conferencing (Front L). Only important video feeds should be placed on that screen to conserve space.
The configuration steps for the Universal Style are explained below. Please follow them step-by-step.
AMX Panel- Access Grid: Front L, Front R, Diagonal
- Whirdboard PC: Side L, Side R
- Preview Monitor: AccessGrid's Output 1
Whiteboard PC- VNC to MacMini full-screen.
Access Grid PC
- Launch CapNSendViewer: Place it on Front R and Diagonal displays. Stretch it to fit the two screens.
- Target VNC sharing to CapNSendViewer: Open VNC server's preference and drag the share screen aiming to CapNSendViewer's window.
- Launch AccessGrid: Check the TALK button.
- Announce TWO whiteboards VNC address and password:
- Current whiteboard: gridwbrd.maths.usyd.edu.au
- History whiteboard: girdroom.maths.usyd.edu.au
- Password: mathconf
MacMini
- OneNote 2007: Press Win key + * key to maximize window across desktop. Then press F11 to make it full-screen.
- Launch Up/Down Control: Icon is on the desktop.
- TEST THE BUTTONS ARE WORKING!
After each lecture
- Saves lecturer's notes: Save "Section" then close it and open a new "Section" for next lecturer.
When room not in use
- Close VNCs: On all machines.
- Close CapNSendViewer
- Return mouse onto charger
- Switch off tablet screens
- Restart MacMini everyday: To prevent sluggish mouse/tablet performance.
SPECIAL PROCEDURES
Displaying and Sharing Lecturer's Personal Computer Screen
Sometimes some lecturers wish to share their personal laptop screen to students. Please arrange with lecturer before lecture starts.
- Install VNC server on lecturer's laptop:
- Mac: Go to System Preference --> Sharing. Tick "Share Screen". Go to advanced option and enable VNC access.
- Windows: Install a copy of TightVNC server.
- Plug Ethernet cable into lecturer's laptop: Note the IP address assigned.
- Use Tablet to VNC into lecturer's laptop: Launch TightVNC Viewer. Key in the IP address noted before and the password assigned to the VNC server.
To exit a full-screen VNC display on Gridwbrd PC- Using Gridroom PC, VNC into the Gridwbrd PC.
- Then activate the Ctrl and Alt buttons on the VNC toolbar.
- Press Shift + F simultaneously.
- Deactivate the Ctrl and Alt buttons again.
Recording an AG session
- In AccessGrid PC, check that AGVCR is in the "Application Sessions" tree. If not, goto Venue-->Start Application Session-->AGVCR Launcher.
- Double-click AGVCR in the "Application Session" tree.
- Goto "Record" tab.
- Choose a new filename for the recording and saves it to C:\LecturerVideos
- Click "Record" button to begin recording.
- Don't forget to stop the recording after the session!
Sharing only a portion of a screenSometimes it is useful to share only a portion of your screen. For example, PowerPoint has presenter's view and slides view. When run on dual screen monitor, they will appear side by side and the presenter only wants to show the slides view part to the world.
- Go into UltraVNC server properties.
- In the "Single Window Sharing" property, tick "Share only the server window named:", and fill in the window's name. To find out the windows name, goto Task Manager's applications tab.
Configuring for PowerPoint PresentationPowerPoint presentation usually only requires one side of the screen (the side that shows the slides) to be shared. While the presenter's view is kept private to the presenter.
In gridwbrd machine, launch UltraVNC Viewer (connecting to gridlect). On the viewer's toolbar, click on the "monitor" symbol until the desired screen that is to be shared appear.
Encounter any problem? Visit the
Troubleshooting page.